
MikroTik RB4011 Configuration
Learn how to configure MikroTik RB4011 for WAN, LAN, DHCP, NAT, firewall, VLAN, PPPoE, ISP, CCTV, VPN, bandwidth and multi-WAN networks.
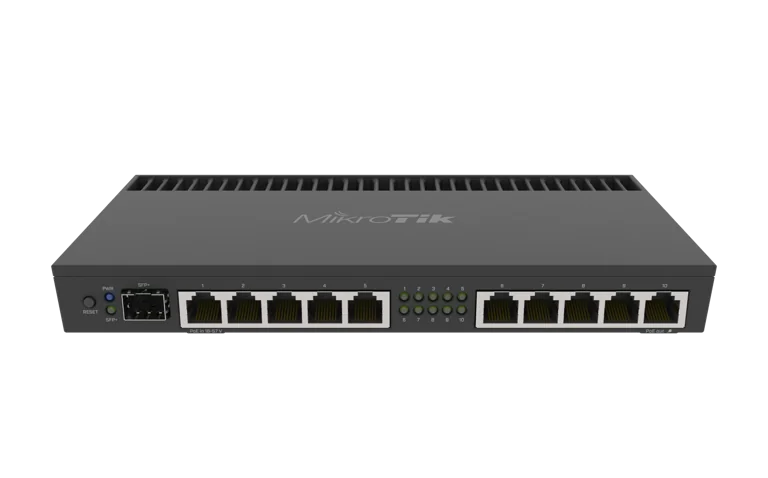
MikroTik RB4011 Configuration
How to Configure MikroTik RB4011 Step by Step
MikroTik RB4011 Configuration Guide | Step-by-Step Setup
The MikroTik RB4011iGS+RM is a powerful professional router commonly used by ISPs, businesses, CCTV installers, schools, hotels and network technicians. Its combination of ten Gigabit Ethernet ports, a 10G SFP+ interface, RouterOS and strong processing performance makes it suitable for both simple and advanced network configurations.
If you are setting up the RB4011 for the first time, this guide explains how to configure the router for internet access, LAN, DHCP, NAT, firewall rules, VLANs, PPPoE, bandwidth management and multi-WAN use.
You can view the MikroTik RB4011iGS+RM or browse other MikroTik products in Kenya.
What You Need Before Configuring MikroTik RB4011
Before starting, make sure you have:
MikroTik RB4011iGS+RM
laptop or desktop computer
Ethernet cable
WinBox
internet connection
ISP credentials if required
administrator access
If the router is being used in an ISP environment, also prepare your:
IP addressing plan
VLAN plan
PPPoE profiles
bandwidth packages
firewall policies
Step 1: Connect to the RB4011
Connect your computer to one of the LAN Ethernet ports.
Open WinBox and go to:
Neighbors
The RB4011 should appear automatically.
You can connect using:
IP address
MAC address
MAC access is especially useful if the router does not yet have a working IP configuration.
Step 2: Change the Administrator Password
After logging in, create a strong administrator password immediately.
Avoid leaving the router with weak or default credentials.
For business and ISP environments, it is better to create separate administrator accounts for trusted technicians.
Step 3: Update RouterOS
Go to:
System → Packages
Check for updates.
Use the stable RouterOS channel unless you have a specific reason to use another release.
After updating RouterOS, also check:
System → RouterBOARD
Upgrade firmware if required and reboot.
Step 4: Identify WAN and LAN Ports
A common setup is:
Ether1 – WAN
Ether2–Ether10 – LAN or other network roles
You can rename interfaces to make management easier.
For example:
ether1 → WAN
ether2 → OFFICE
ether3 → CCTV
ether4 → SERVERS
ether5 → ACCESS-POINTS
This makes future troubleshooting easier.
Step 5: Configure WAN
The WAN configuration depends on your ISP.
Common options include:
DHCP
static IP
PPPoE
DHCP WAN
Go to:
IP → DHCP Client
Add a DHCP client on the WAN interface.
The router should receive:
IP address
gateway
DNS
Static IP WAN
Go to:
IP → Addresses
Add the static IP given by your ISP.
Then configure the gateway under:
IP → Routes
PPPoE WAN
Go to:
PPP → Interfaces
Add a PPPoE Client.
Enter the username and password provided by the upstream ISP.
Step 6: Create a LAN Bridge
Go to:
Bridge
Create a bridge called:
LAN-BRIDGE
Then add internal interfaces under:
Bridge → Ports
For example:
ether2
ether3
ether4
ether5
ether6
ether7
ether8
ether9
ether10
Do not add the WAN interface to the LAN bridge.
Step 7: Assign the LAN IP Address
Go to:
IP → Addresses
Assign an IP such as:
192.168.10.1/24
to:
LAN-BRIDGE
This becomes the default gateway for your local network.
Step 8: Configure DHCP Server
Go to:
IP → DHCP Server
Run:
DHCP Setup
Choose:
LAN-BRIDGE
Example:
Network:
192.168.10.0/24
Gateway:
192.168.10.1
Pool:
192.168.10.20-192.168.10.254
This allows devices to receive IP addresses automatically.
Step 9: Configure DNS
Go to:
IP → DNS
Add your preferred DNS servers.
If clients will use the router as a DNS resolver, enable:
Allow Remote Requests
Ensure firewall rules prevent WAN abuse.
Step 10: Configure NAT
Go to:
IP → Firewall → NAT
Create a rule:
Chain:
srcnat
Out Interface:
WAN
Action:
masquerade
This allows LAN devices to access the internet.
Step 11: Configure Basic Firewall Rules
A professional MikroTik setup should never operate without proper firewall protection.
Typical logic includes:
accept established traffic
accept related traffic
drop invalid traffic
allow trusted LAN access
allow required ICMP
block unsolicited WAN management access
Do not copy complex firewall rules blindly.
Use rules that match your actual network.
Step 12: Restrict Management Services
Go to:
IP → Services
Disable unused services such as:
Telnet
FTP
API
Restrict WinBox, SSH and WebFig to trusted IP ranges where possible.
Step 13: Configure VLANs
The RB4011 is excellent for VLAN-based business and ISP networks.
Example:
VLAN 10 – Management
VLAN 20 – Staff
VLAN 30 – CCTV
VLAN 40 – Guest
VLAN 50 – Servers
Each VLAN can have its own:
IP subnet
DHCP server
firewall rules
bandwidth policy
Be careful with bridge VLAN filtering because an incorrect configuration can lock you out.
Step 14: Configure SFP+ Uplink
The RB4011 includes a 10G SFP+ port.
Use it for:
fibre uplink
10G switch connection
ISP backbone
server network
Install a compatible module and check:
Interfaces
to confirm the link is active.
Step 15: Configure PPPoE Server
For ISP use, go to:
PPP → Profiles
Create internet profiles.
Example:
5 Mbps
10 Mbps
20 Mbps
50 Mbps
Then configure:
PPP → PPPoE Servers
and create subscribers under:
PPP → Secrets
For larger networks, use centralized RADIUS integration rather than manually managing all users on the router.
ISPs can also use Tajira for subscriber and billing workflows alongside MikroTik.
Step 16: Configure Bandwidth Management
RouterOS gives you several options:
Simple Queues
Queue Tree
PCQ
PPP profiles
These can be used to manage:
customers
departments
guests
CCTV
critical services
For ISPs, PPP profiles are often useful for assigning subscriber speed packages.
Step 17: Configure Multi-WAN
The RB4011 is well suited to multiple WAN connections because it has many Ethernet ports.
Example:
Ether1 – Fibre ISP A
Ether2 – Fibre ISP B
Ether3 – Starlink
RouterOS can then be configured for:
failover
load balancing
policy routing
Step 18: Configure Failover
A simple failover design uses route distances.
For example:
Primary gateway:
Distance 1
Backup gateway:
Distance 2
For more reliable detection, recursive routing or Netwatch can be used.
Step 19: Configure Load Balancing
Common methods include:
PCC
ECMP
policy routing
Load balancing should be tested carefully because some applications require connection consistency.
Step 20: Configure the RB4011 for CCTV
Create a dedicated CCTV VLAN.
Example:
VLAN 30
Subnet:
192.168.30.0/24
Use firewall rules to restrict access between CCTV devices and other internal networks.
For remote monitoring, VPN access is generally safer than exposing cameras directly to the internet.
Step 21: Configure VPN
The RB4011 can support multiple VPN technologies.
Common use cases include:
remote staff
branch offices
remote CCTV
technician access
RouterOS v7 supports options such as:
WireGuard
IPsec
SSTP
L2TP
Choose the VPN according to your security and compatibility requirements.
Step 22: Back Up the Configuration
After completing the setup, create a backup.
Go to:
Files → Backup
Also create an export:
/export file=rb4011-config
Store the files securely.
Recommended RB4011 Setup for Business
A practical setup could be:
Ether1 – WAN
Ether2 – Staff
Ether3 – CCTV
Ether4 – Servers
Ether5 – Access Points
Ether6 – Guest
Ether7 – Management
Ether8 – Backup WAN
Ether9 – VoIP
Ether10 – PoE device
SFP+ – Core switch
This creates a flexible professional network.
Recommended RB4011 Setup for ISP
For a small or medium ISP:
WAN uplink
distribution link
management VLAN
PPPoE server
customer address pools
bandwidth profiles
firewall rules
RADIUS integration
monitoring
The RB4011 can work well for this type of deployment depending on bandwidth and subscriber load.
Common RB4011 Configuration Mistakes
Avoid these common issues:
Wrong Bridge Configuration
Do not accidentally bridge the WAN interface into the LAN.
Poor Firewall Rules
Avoid leaving the router openly accessible from the internet.
Incorrect VLAN Filtering
Always maintain management access while configuring VLANs.
No Backup
Create a backup before making major changes.
Overloading the Router
Monitor CPU usage and traffic if the network grows significantly.
MikroTik RB4011 Price in Kenya
If you are still choosing the router, check the current MikroTik RB4011iGS+RM price in Kenya.
You can also compare MikroTik router prices in Kenya or browse additional MikroTik products.
Frequently Asked Questions
How do I configure a MikroTik RB4011?
Connect using WinBox, configure WAN, create a LAN bridge, assign IP addresses, configure DHCP, DNS, NAT, firewall and any required VLAN or PPPoE services.
Can RB4011 run PPPoE?
Yes. RouterOS supports PPPoE server and client functionality.
Can RB4011 manage VLANs?
Yes. It supports advanced VLAN and bridge configurations.
Can RB4011 manage multiple internet connections?
Yes. It can support failover, load balancing and policy routing.
Does RB4011 support 10G?
Yes. It has one 10G SFP+ interface.
Is RB4011 good for an ISP?
Yes, for appropriately sized deployments.
Can RB4011 manage bandwidth?
Yes. RouterOS includes Simple Queues, Queue Tree, PCQ and PPP profiles.
Can RB4011 be used for CCTV?
Yes. It can isolate CCTV using VLANs and firewall rules.
Does RB4011 support VPN?
Yes. RouterOS supports multiple VPN technologies.
Where can I buy RB4011 in Kenya?
You can view the MikroTik RB4011iGS+RM on MikroTik Kenya.
Final Thoughts on MikroTik RB4011 Configuration
The MikroTik RB4011iGS+RM is a flexible router that can be configured for:
business networks
ISP networks
CCTV
VLANs
PPPoE
bandwidth management
VPN
multi-WAN
10G uplinks
A basic setup only requires WAN, LAN, DHCP, NAT and firewall configuration.
Professional deployments can go much further.
The most important rule is to configure the router according to the actual network rather than copying a generic configuration without understanding it.
If you are planning a new deployment, check the current MikroTik RB4011iGS+RM price in Kenya before purchasing.